Google Apps Script
Customizing the behavior of a Google Form using Google Apps Script.
The Setup
The owner of a small business comes to you with a problem. Her business offers specialized training courses for professionals, and clients earn a certification by correctly answering a quiz at the end. Unfortunately, manually grading these quizzes takes a lot of time.
Your task is to craft an automated solution that leverages her existing infrastructure. Currently, her business uses Google Forms for the quizzes.
Google Forms can be configured as a quiz where each question earns a certain number of points. When a user submits the quiz they can see their score, but Google Forms does not provide any kind of grading feature. The Form creator can view all the quiz results, but then it is up to her to do something with those results.
Your job will be to automatically send quiz-takers a PDF certificate if they score high enough on the quiz.
The Specification
The business offers multiple different training courses, with different names and durations.
- A passing score is 75% or higher.
- If the user passes, they receive an email certificate.
- The certificate is a PDF with parameters:
- Full name
- Date
- Name of training
- Number of credit hours in the training
Apps Script Overview
The purpose of Apps Script seems to be to enable extensions to Google's cloud products like Google Sheets, Google Forms, Gmail, etc. This idea is very similar to VBA for Microsoft Office products, except instead of using Visual Basic as the scripting language, you use JavaScript. But the language is just one part of a larger system. Most noticeably, this system includes Apps Script classes that provide interfaces to products like Google Sheets and Gmail. These classes are available to the language at runtime, and the ones you'll use in this job are:
- DriveApp
- EmailApp
- FormApp
- HtmlService
- SpreadsheetApp
- Utilities
In addition to using JavaScript, you can also add HTML sources to your script. For this application, you will use HTML as the template for the certificate.
Deployment Options
Apps Scripts have multiple deployment options, but the forms already exist, so here you choose to use a "container-bound" script. For each Form, you follow this procedure:
- Open the form.
- Within the Form, launch the Script Editor.
- Write a script.
- Add a Trigger so the script runs "on Form Submit".
- Test, debug, repeat.
Implementation Details
The way this implementation works is as a function that takes a Form submission as "input" and produces a PDF as an "output" and also updates an existing spreadsheet. So you start with the Form.
const form = FormApp.getActiveForm(); // the "parent" to which this script is "container-bound"
const response = form.getResponses().at(-1); // most recent form submission
Even though the Apps Script runs on the "on form submit" trigger, it can actually access all the previous submissions through the FormApp class.
For now though, all you need is the most recent submission, hence the .at(-1).
Next, if you want to calculate the user's score, you need two things: the number of points possible, and the number of points earned.
To get the total points possible, look to the form rather than the response:
const items = form.getItems();
let possible = 0;
for (let item of items) {
  switch (item.getType()) {
  case FormApp.ItemType.CHECKBOX: possible += item.asCheckboxItem().getPoints(); break;
  case FormApp.ItemType.MULTIPLE_CHOICE: possible += item.asMultipleChoiceItem().getPoints(); break;
  // TODO: if the quiz uses additional item types, insert more case statements to handle them here...
  default: continue;
  }
}
After writing this, you wonder to yourself why getPoints is not a method of item, but decide not to dwell on the matter.
Next you need to tally the user's score for this attempt.
You can't spell "functional programming" without "fun", so…
const total = items.reduce((x,item)=>x+response.getGradableResponseForItem(item).getScore(), 0);
This is the minimum you need to send an email if the user scores high enough:
const passed = total >= 0.75 * possible;
if (passed) {
  MailApp.sendEmail('[email protected]', 'email subject', 'email body text', {
    name: 'sender name',
    attachments: []
  });
}
Next you preview your own quiz, and answer all the questions correctly in order to verify that the real email address you used in place of [email protected] received the email from you.
You did remember to swap that out for a real email address, right?
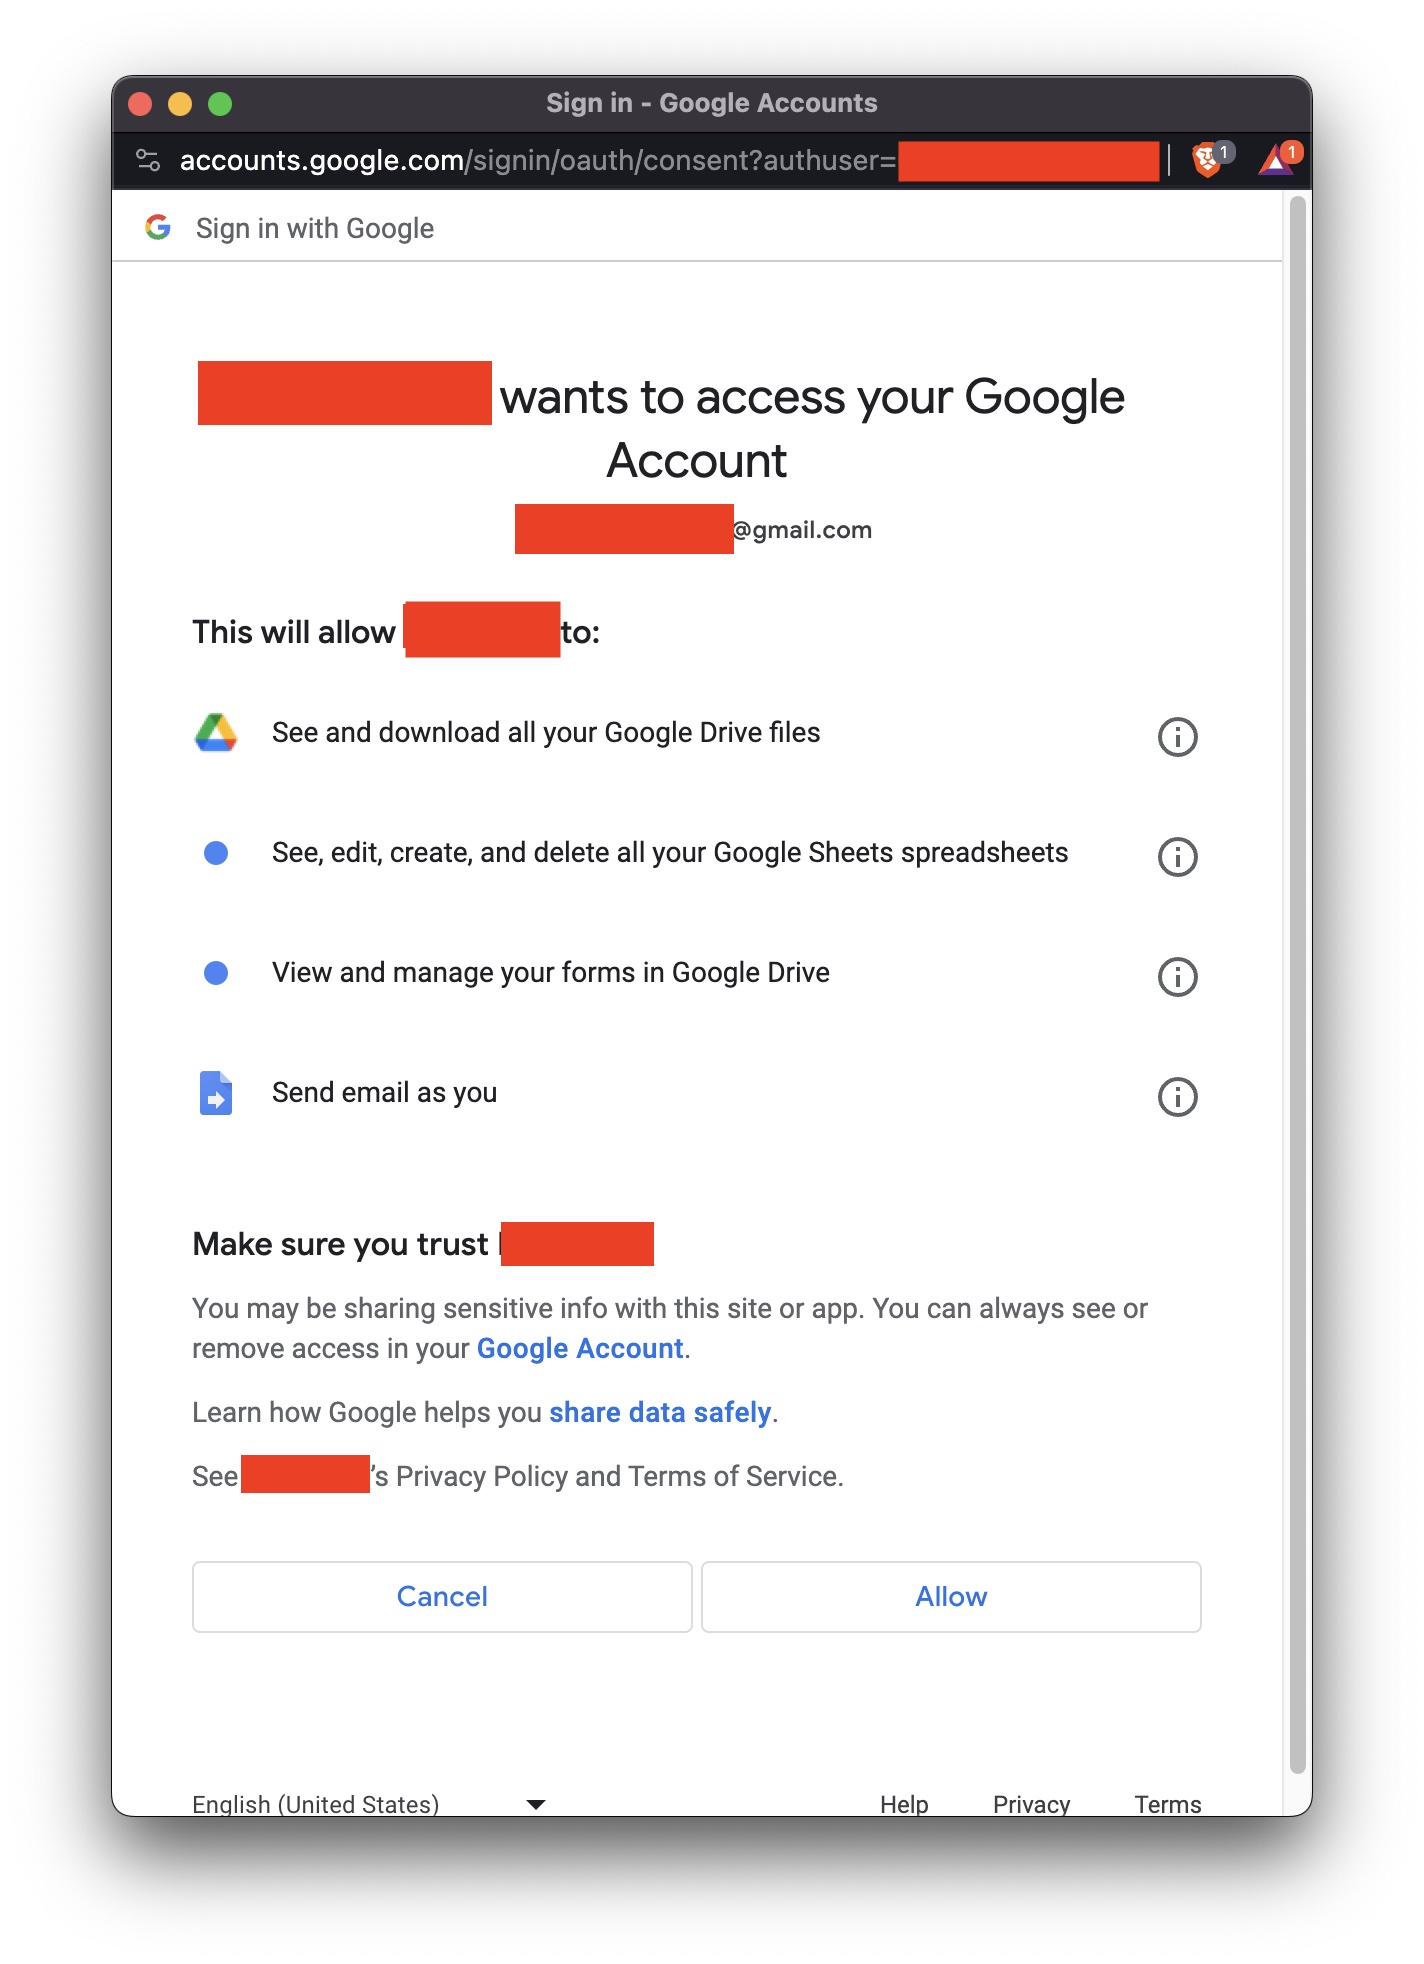
But not so fast, first you must give permission for the app script to send an email on your behalf.

You also need to verify that you're willing to run the script made by "the developer". Since in this case, the developer is yourself, you can confidently click the "Advanced" link:

Finally, you can consent to all the different permissions you added (email, Sheets, Drive, etc):
Run through your checklist before you start sending links to customers:
- Ensure you use the right Google account for this script.
- Test your quiz to verify it only sends the certification with a passing score.
- Check that the email goes to the right recipient.
More Features
At this point your main .gs file looks like this:
function myFunction() {
  const form = FormApp.getActiveForm();
  const response = form.getResponses().at(-1);
  const items = form.getItems();
  const email = response.getRespondentEmail();
  let possible = 0;
  for (let item of items) {
    switch (item.getType()) {
    case FormApp.ItemType.CHECKBOX: possible += item.asCheckboxItem().getPoints(); break;
    case FormApp.ItemType.MULTIPLE_CHOICE: possible += item.asMultipleChoiceItem().getPoints(); break;
    default: continue;
    }
  }
  const total = items.reduce((x,item)=>x+response.getGradableResponseForItem(item).getScore(), 0);
  const passed = total >= 0.75 * possible;
  if (passed) {
    MailApp.sendEmail(email, 'Subject Line', 'Congratulations! Please find the attached certificate.', {
      name: 'Sender Name',
      attachments: []
    });
  }
}
You demo this prototype to the owner, and she confirms this is how it should work. Now it's time to create the PDF certificate. While it's possible to generate a string of html and then render it as a PDF, it's not the most secure method. You could interpolate the values like this:
const html = `email: <h1>${responseItem.getResponse()}</h1>`;
But then what if responseItem was a text field where they could write anything?
To ensure the integrity of the certification, you want to prevent the quiz-taker from bypassing the whole grading process and receiving an unearned certificate.
There are many ways to address this vulnerability that all fall under the umbrella of sanitizing untrusted input.
The way you think about this is that any place where a user is able to freely write whatever they want is a potential vulnerability. Here you need to balance convenience and usability on the user's side with the integrity of the result on the application's side. In the case of a textbox, it's safe to assume that you really want the user to have freedom to write whatever they want, and so you do not restrict anything on their side. Client-side validation should be thought of as feedback to the user to inform a legitimate user how to best use the application. It's important to not treat client-side validation as a security feature, because it is trivially bypassed by an attacker. On the other hand, server-side validation is something you can use for security. Google Apps Scripts have a feature they call HTML Templates, which allow you to insert data from the user into HTML with varying degrees of safety. They call this feature Scriptlets.
- Standard scriptlets allow mixing code and HTML.
- Printing scriptlets interpolate values but apply contextual escaping to prevent a malicious user from injecting HTML.
- Force-printing scriptlets interpolate without escaping (danger zone!).
The way you use Templated HTML is to add a new file to the Apps Script project (in this example it is named Index.html). The corresponding Index.html file can be sprinkled with Scriptlets such as:
<!doctype html>
<html>
  <head>
  </head>
  <body>
    <p><?= data ?></p>
  </body>
</html>
And then populated by the code in the Script.gs file:
const html = HtmlService.createTemplateFromFile('Index');
html.data = 'hi world';
Putting it all together, we have a Code.gs file:
// run on form submit trigger
function myFunction() {
  // TODO: Change the following two strings for use with different quiz/sheet:
  const mySpreadsheetID = 'idNumber'; // spreadsheet ID (from Sheets url)
  const mySheet = 'Quiz Name'; // page name (from the above spreadsheet)

  const form = FormApp.getActiveForm();
  const title = form.getTitle();
  const response = form.getResponses().at(-1);
  const items = form.getItems();
  const email = response.getRespondentEmail();
  let possible = 0;
  for (let item of items) {
    switch (item.getType()) {
      case FormApp.ItemType.CHECKBOX: possible += item.asCheckboxItem().getPoints(); break;
      case FormApp.ItemType.MULTIPLE_CHOICE: possible += item.asMultipleChoiceItem().getPoints(); break;
      case FormApp.ItemType.TEXT: fullName = response.getResponseForItem(item).getResponse(); break;
      default: continue;
    }
  }
  const total = items.reduce((x,item)=>x+response.getGradableResponseForItem(item).getScore(), 0);
  const date = new Date();
  const credits = form.getDescription().split(' ').map(parseFloat).filter(Number).pop();
  const html = getHtml(date, title, fullName, credits);
  const pdf = htmlToPDF(html, fullName);
  const sheet = SpreadsheetApp.openById(mySpreadsheetID).getSheetByName(mySheet);
  const passed = total >= 0.75 * possible;
  sheet.appendRow([date.toString(), email, fullName, possible, total, passed]);
  if (passed) {
    MailApp.sendEmail(email, 'Subject Line', 'Congratulations! Please find the attached certificate.', {
      name: 'Sender Name',
      attachments: [pdf]
    });
  }
}


//@param html:HtmlOutput - the html code to be converted
//@param title:string - the name for the resulting pdf
//@return pdf:Blob
function htmlToPDF(html,title) {
  html.setWidth(800).setHeight(600).setTitle(title);
  return html.getBlob().getAs("application/pdf");
}

function dfmt(date) {
  const m = "January February March April May June July August September October November December".split(" ")[date.getMonth()];
  const d = date.getDate();
  const dth = d+([1,2,3,21,22,23,31].includes(d)?[0,'st','nd','rd'][d%10]:'th');
  return `${m} ${dth}, ${date.getFullYear()}`;
}

//@param date:string - formatted datetime
//@param title:string - name of result document
//@param fullName:string - as it should appear on the document
//@param credits:int - quiz score
//@return HtmlOutput
function getHtml(date, title, fullName, credits) {
  const b64 =(x)=>Utilities.base64Encode(DriveApp.getFileById(x).getBlob().getBytes());
  const h = HtmlService.createTemplateFromFile('Index');
  h.logo0 = `data:image/png;base64, ${b64('id_1')}`; // replace id_N with Drive url for image
  h.logo1 = `data:image/jpeg;base64, ${b64('id_2')}`;
  h.logo2 = `data:image/jpeg;base64, ${b64('id_3')}`;
  h.sig = `data:image/png;base64, ${b64('id_4')}`;
  h.date = dfmt(date);
  h.title = title;
  h.fullName = fullName;
  h.credits = credits; // WARN - input is parseInt("8 Cr") so be careful if this changes
  return h.evaluate();
}
And the corresponding Index.html:
<!DOCTYPE html>
<html>
  <head>
    <base target="_top">
    <style>
      page {
          text-align:center;
          background-color: #fffdeb;
      }

      @media print{
        page {
            padding:0!important;
            margin:0!important;
        }
      }
      @page {size:landscape; margin:0cm;}

      .completion {font-family:caps;}
      .logo img {width:15em;}
      .signature {height:2em;}
      .signature-label {font-style:italic;}
      .foot {
          width:100%;
          display:flex;
          flex-direction:row;
          justify-content:space-around;
          align-items:center;
      }
      .l1, .l2 {display:block; max-width:6em;}
    </style>
  </head>
  <body>
    <page>
      <div class="logo">
        <img src="<?!= logo0 ?>">
      </div>
      <div class="container">
        <h1 class="completion">Certificate of Completion</h1>
        <p>This is to certify that</p>
        <h2><?= fullName ?></h2>
        <p>completed</p>
        <h2><?= title ?></h2>
        <p>on <?= date ?></p>
        <hr class="glyph">
        <div class="credits">
          <p><?= credits ?> Credit Hours Issued by</p>
          <p>Name of Institution</p>
          <br>
          <p><img class="signature" src="<?!= sig ?>"></p>
          <hr class="style">
          <p class="signature-label">SIGNATURE</p>
          <br>
        </div>
        <div class="foot">
          <img class="l1" src="<?!= logo1 ?>">
          <div class="post">
            <p>Company Name</p>
            <br>
            <p>555-1234</p>
            <br>
            <p>[email protected]</p>
            <p>Address 123</p>
            <p>City, State 00000</p>
          </div>
          <img class="l2" src="<?!= logo2 ?>">
        </div>
      </div>
    </page>
  </body>
</html>
Conclusions
Now you have an extension to Google Forms that uses Apps Script, emails template-based PDFs, and updates a Google Sheet. What are some of the pros and cons of this approach?
Pro:
- Integrates with client's existing workflow
- Low ongoing maintenance
- Uses familiar technologies
- Good defaults for secure HTML
Con:
- Vendor lock-in with Google products
- Differences from browser-based JS not always obvious
- Permissions are coarse-grained
- Still need to be cautious with user input and threat modeling
You decide that for this scale of project, the benefits outweigh the drawbacks. This might become a harder decision as the size of the project increases, or if it requires integrations with third-party applications and APIs. But for non-software companies already using Google products who just need small amounts of extra functionality, Apps Script lands squarely in a sweet spot of functionality and ease of use.