Low Impedance Pickup
Building a low impedance guitar pickup prototype.
Pickup Types
Electric guitars have a pickup to convert the motion of the strings to an electrical signal. The most common type of pickup consists of thousands of turns of fine wire around a magnetic core. The purpose of the magnet is to magnetize the steel strings, so that when they vibrate they induce currents in the coil. You can find equations for inductors (coils of wire) to find out what number of turns and core material result in what inductance value, but in simple terms, more turns produce more output.
The large number of turns makes the output impedance of this kind of guitar pickup high compared to other audio equipment. "High" output impedance roughly equivalent to having a high voltage to current ratio. To achieve a good signal transfer with minimal noise, a guitar pickup should be plugged into a very high impedance input.
To get a sense of the numbers associated with "high" and "low" in this context, a normal guitar pickup may have an output resistance (sort of like impedance, but easier to measure) around 7000 ohms (7k). A "high-output" pickup might have something like 12k-18k ohms of output resistance, and be capable of delivering higher output voltages for the same amount of string vibrating.
Guitar amplifier inputs, built with this kind of guitar pickup in mind, have input resistance values around 100k to 1 million ohms. As with other musical things, this is not an iron law and some amplifiers or effects have much lower input resistances, down to around 1k-10k for some fuzz effects. Such low values "load" a high-impedance pickup in a way that colors the sound. For intentional distortion effects like fuzz, this is beneficial because it pre-filters the sound in a nice-sounding way, generally by reducing high frequency energy.
This general rule of high-impedance pickups and even-higher-impedance amplifier inputs is the way electric guitars and their amplifiers have been built for decades, and is a part of their characteristic tonal qualities.
Low Impedance Pickups
But thousands of turns of fine wire is just one way to make a pickup. We can also make a pickup using the same basic principles, but with few turns of heavy wire. Or taken to the limit, a single turn of heavy wire.
That's the basic idea used in the designs discussed in this forum discussion1, and also the basis for the Lace Music Products' Alumitone pickup model2.
The Prototype
After thinking about the various designs in the forum thread, I went with a design that optimizes ease of construction with a limited set of tools.

Figure 1: Prototype
The body is made from two pieces of 2 inch wide aluminum plate. I cut 2 slots into the top, and inserted steel "rails" in the slots, covered in black electrical tape and taped into position on the underside of the pickup.
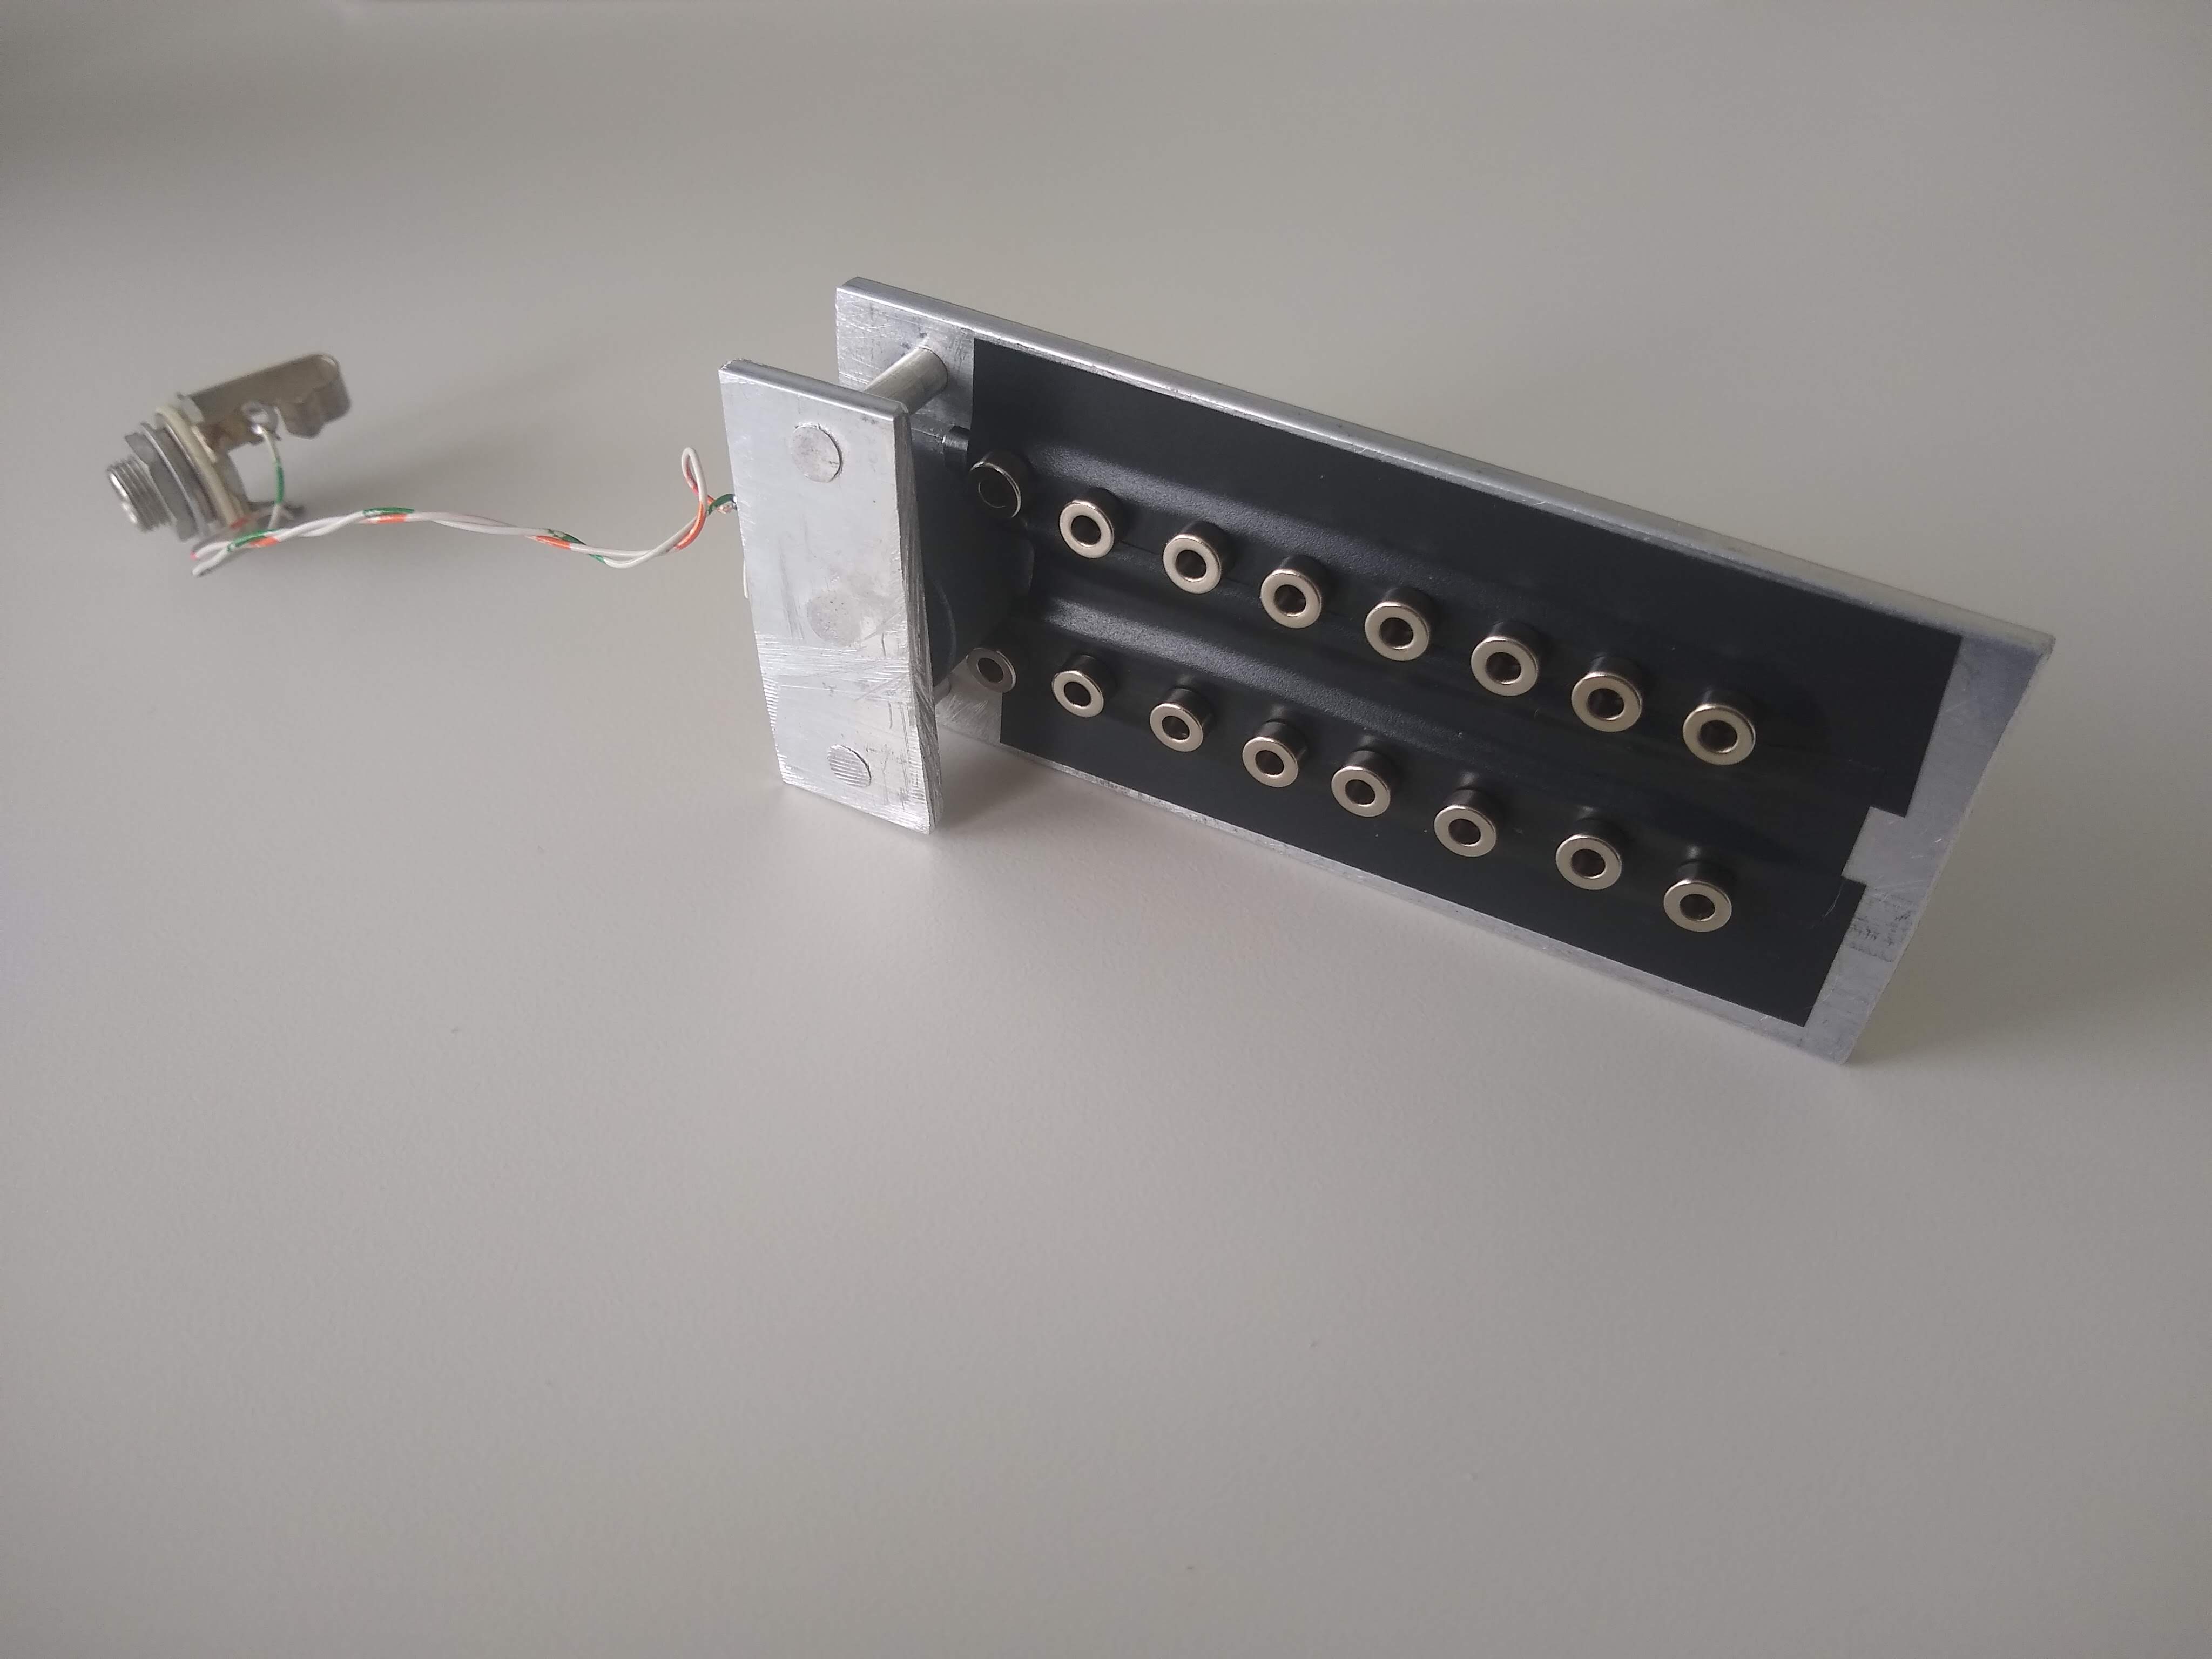
Figure 2: Bottom Side
The rails guide the magnetic field through the slots so the magnets can be mounted on the underside. This lets the pickup be mounted closer to the strings without the magnetic field being so strong that it interferes with the string vibration (also known as "wolf tones").
The top plate with the slots provides a two paths for current to flow, and by orienting one row of magnets North-South and the other row South-North, this should encourage the current to flow clockwise in one path and counterclockwise in the other path. The center strip is wider, because both the clockwise and counterclockwise currents flow through this same path and should sum together, so I guessed that they should have a lower resistance path. This orientation of magnets and coil direction, and using their sum, is known as a "humbucker" pickup, because two pickups in close proximity with opposite phase reject common-mode noise like hum from power electronics.
This center path continues through a toroidal current transformer3 with a 1000:1 ratio and a DC resistance of 41.80 ohms. Three aluminum rods connect the top plate to a bottom plate, and I treated these as rivets by hammering them into place so the rod material expanded in the drilled holes on the top and bottom plates. To prevent this hammering from damaging the current transformer, I turned a "shoulder" rivet on a makeshift lathe, using a Dremel to grind material away as the rod spun in the drill chuck. This is a terrible way to make a lathe, but the second try produced adequate results.
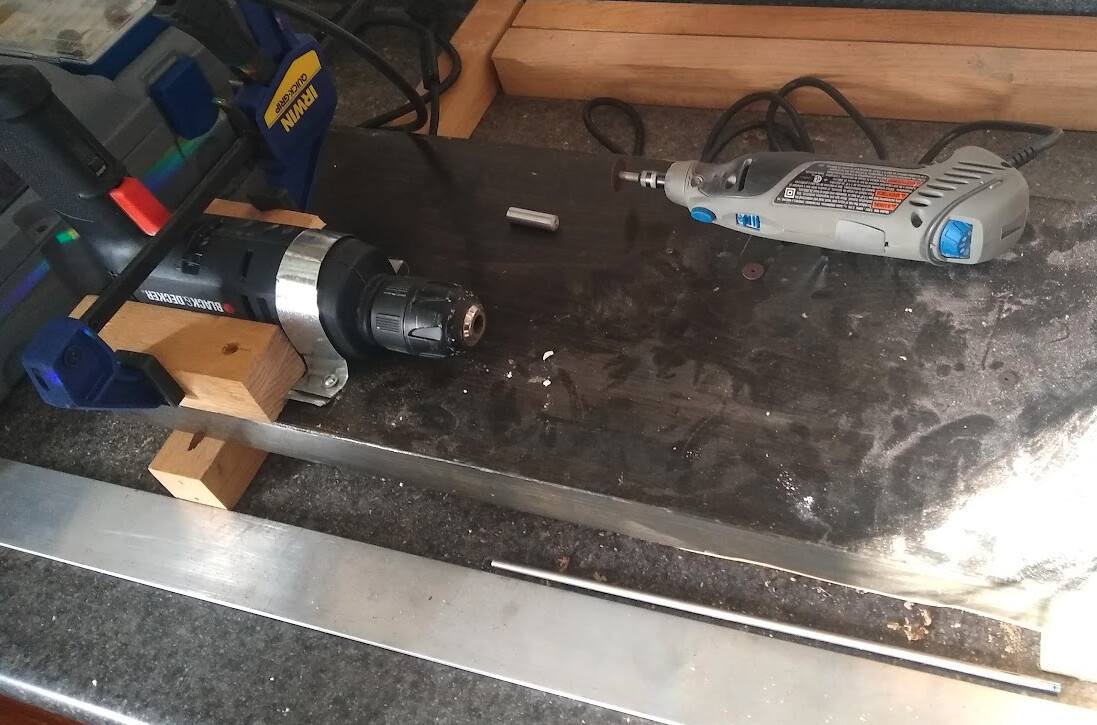
Figure 3: Cursed Lathe
SCAD Model
Over the holidays I learned just enough OpenSCAD to produce this model, which I then printed out to scale and traced onto some plate aluminum to make the flat components.
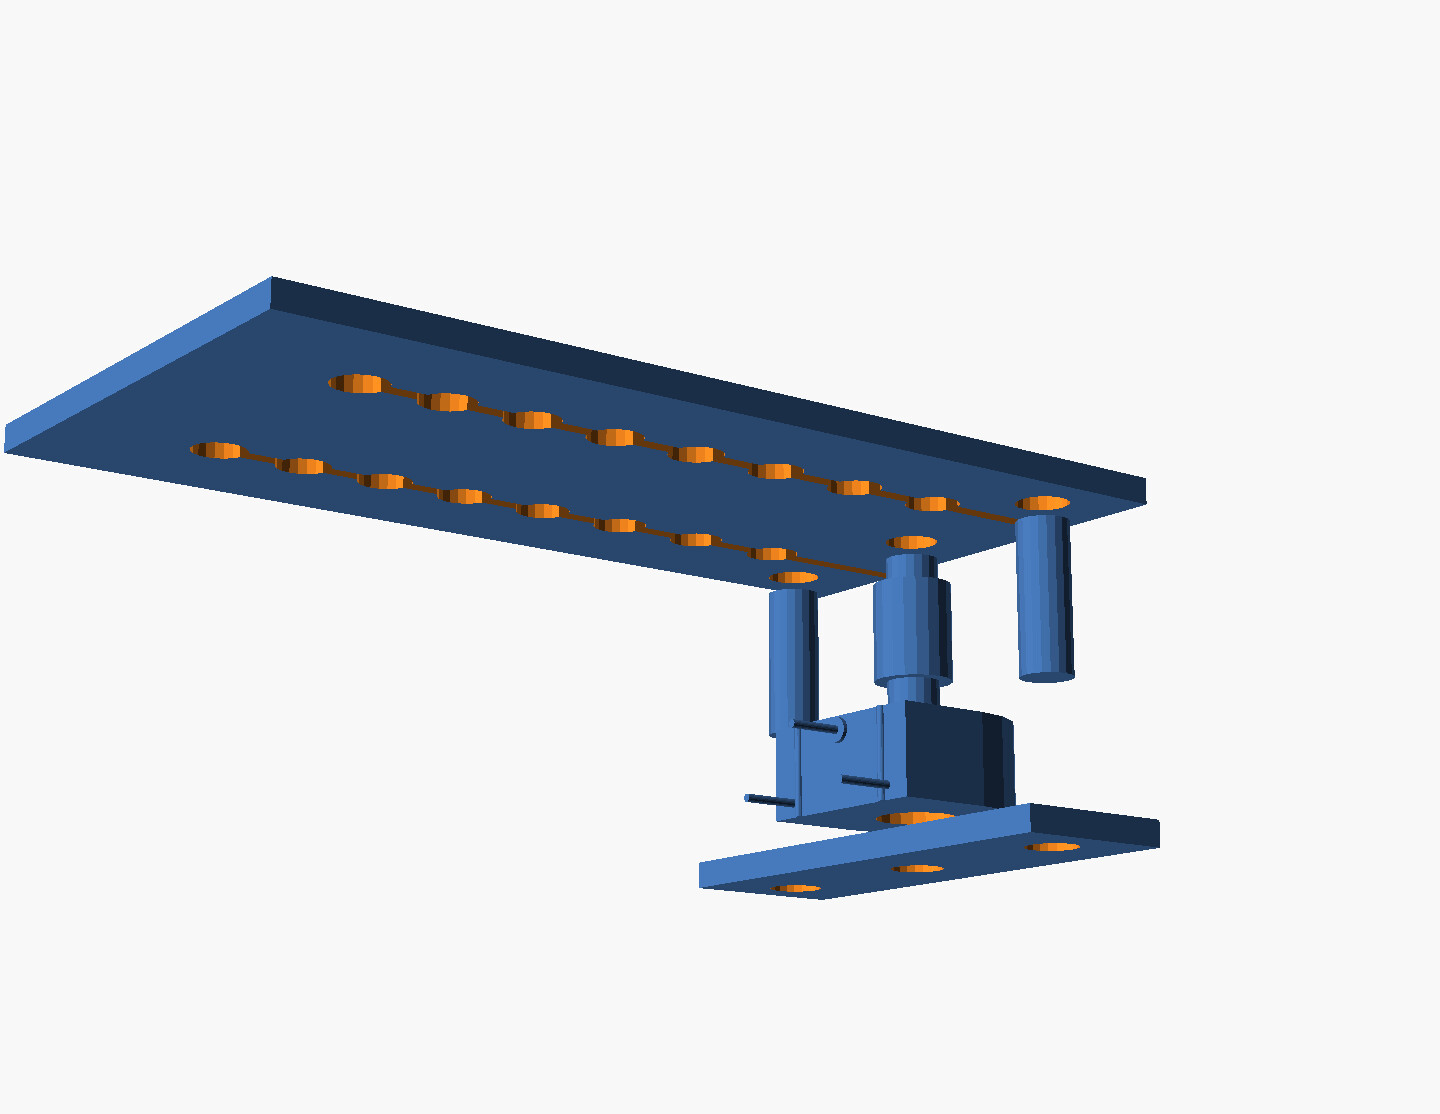
Figure 4: Exploded View
Overall I'm happy with using OpenSCAD for this sort of thing. For some reason, creating a model with code feels more precise than using something like SketchUp or Fusion360.
// units: mm
$fn = 10; //larger number for more fine radii
centers = [0,10.30,20.69,31.23,42.02,53.09,64.46,76.24]; //string centers
dmag = mm(1/4)+1;
drivet = mm(3/8);
r1 = mm(3/16); // small rivet
e = 0.02; //epsilon
width = 84.24; //bridge width
length = mm(2); //2 inch wide plate
thickness = 3.175;
border = 30;

function mm(inches) = inches * 25.4;

module magnet_cuts(){
 for(j=[-1,1]){
  for(i=centers){
   translate([-width/2+dmag/2+i,j*length/4,0])
    // cylinder(h=thickness+e,d=dmag,center=true);
    rotate(45) cube([3,3,thickness+e],center=true); //diamonds for alignment
  }
  translate([centers[1]*1,j*length/4,0])
   cube([width+centers[1],1,thickness+e],center=true);
 }
}

module rivet_holes(h){
 for(i=[-1,0,1]){
  translate([width*0.56,i*(length/3+3),h])
   cylinder(h=thickness+e,d=r1,center=true);
 }
}

module upper(){
 difference(){
  cube([width+border,length,thickness],center=true);
  magnet_cuts();
  rivet_holes(0);
 }
}

module lower(spacing){
 difference(){
  translate([width-border-7,0,spacing])
   cube([20,length,thickness],center=true);
  rivet_holes(spacing);
 }
}

module ac1005(){
 d1 = 23.8;
 d2 = 9.8;
 d3 = (d1-15.24);
 h = 11.12;
 wl = 8;
 difference(){
  union(){
   cylinder(d=d1,h=h,center=true);
   translate([0,d1/4,0]) cube([d1,d1/2,h],center=true);
   translate([0,15,h/2-1.75]) rotate([90,0,0]) cylinder(d=1,h=wl,center=true);
   translate([0,d1/2,h/2-1.75]) rotate([90,0,0]) cylinder(d=3,h=1,center=true);
   translate([d3,15,-h/2+1.75]) rotate([90,0,0]) cylinder(d=1,h=wl,center=true);
   translate([-d3,15,-h/2+1.75]) rotate([90,0,0]) cylinder(d=1,h=wl,center=true);
   translate([d3-1,d1/2,0]) cylinder(d=1,h=h,center=true);
   translate([-d3+1,d1/2,0]) cylinder(d=1,h=h,center=true);
  }
  cylinder(d=d2,h=h+e,center=true);
 }
}

module rivet(h){
 translate([width/2+5,0,h])
  union(){
  cylinder(d=r1,h=mm(1/4)+12,center=true);
  cylinder(d=drivet,h=12,center=true);
 }
 for(i=[-1,1]){
  translate([width/2+5,i*(length/3+3),h])
   cylinder(d=r1,h=mm(1/4)+12,center=true);
 }
}

module main(explode,plates){
 h2 = explode ? -30 : -mm(1/4)-1;
 h1 = explode ? -40 : h2*2;
 h3 = explode ? -13 : -7.4;
 union(){

  // Display only the upper and lower plates, and use projection()
  // and export as PDF, then print to scale.
  upper();
  translate([plates?21:0,0,0]) lower(h1);

  // Uncommment these to see more components:
  // translate([plates?38:0,0,0]) rivet(h3);
  // translate([plates?64:0,0,0])
  //  translate([width-border-7,0,h2])
  //   rotate(90) ac1005();
 }
}
projection() // comment this line for the 3d view
translate([-width/2,-length,0]) rotate(90) main(false,true);
Sound Test
A quick sound test, with first ceramic and then neodymium magnets, demonstrates basic functionality. It seems to be about half the loudness of a P90 pickup, which is not great. On the other hand, the noise seems to be so low as to be inaudible above the hiss of the amplifier. Handling noise from the pickup is about the same as a P90.
Next Steps
There are some design choices that I will do differently next time. First, instead of using the relatively large current transformer with the 3/8 inch bore, I will use two or more smaller current transformers4. This will not only allow for more wiring options (e.g. adding in series or parallel), but also potentially more output. Also, the 3-rivet design has a flaw in the sense that I can't tell the quality of the connection of the outside "legs". It's possible that the output from one coil is much higher than the other, or even that one coil simply does not work. All I know for sure is that there is a path for current to flow through at least one of the coils. I do like this current transformer based approach in general, so I think the next revision will still use the same basic idea.
Instead of a slotted design with 3 connecting rods, I would like to try a design with just 2 connecting rods. This would make the quality of the electrical connection of the rivets more apparent.
A more involved next step is to mount the pickup more permanently in a guitar to allow for more extensive testing, or at least to allow me to actually play the guitar normally and without the pickup falling off.
Footnotes:
A Music Electronics Forum post with over 30 pages and lots of inspiring designs.
The Lace Alumitone Pickup line are all humbucking, even in the "single coil" shape.
Talema AC1005 Current Transformer, the smallest of its family.
Talema AP1000 Current Transformer, an even smaller current transformer.